Interface Tutorial
From Moviesandbox
| (17 intermediate revisions not shown.) | |||
| Line 5: | Line 5: | ||
<h3>Select Tool (v)</h3> | <h3>Select Tool (v)</h3> | ||
| - | [[Image:selectTool.jpg| | + | [[Image:selectTool.jpg|thumb|left|48px]] |
| - | + | Allows you to select objects you want. Right click objects for additional menu options. Click on the Gizmo that appears after selecting to move/rotate in a specific axis. Hold SHIFT to multi-select.<br/><br/><br/><br/><br/> | |
| - | Allows you to select objects you want. Right click objects for additional menu options. Click on the Gizmo that appears after selecting to move/rotate in a specific axis. Hold SHIFT to multi-select. | + | |
| - | + | ||
| - | + | ||
| - | + | ||
| - | + | ||
| + | [[Image:selectParticlesTool.jpg|thumb|left|48px]] | ||
| + | Right click on the tool icon and select "Select Particles" to select individual particles from within a drawing. A drawing must already be selected for this to work.<br/><br/><br/><br/><br/> | ||
<h3>Navigate Tool (TAB)</h3> | <h3>Navigate Tool (TAB)</h3> | ||
| - | [[Image:navTool.jpg| | + | [[Image:navTool.jpg|thumb|left|48px]] |
| - | + | ||
'''Toggles - when pressing TAB again you will switch to the last selected tool!''' | '''Toggles - when pressing TAB again you will switch to the last selected tool!''' | ||
| - | Allows navigation through space in the x, y and z axis, click-left and drag for turning, click-right and drag for movement (hold shift for z-axis movement). Arrow keys or the q, w, e, a, s, d characters also always move. (Tip: the arrow keys and the characters are active in all tools!). | + | Allows navigation through space in the x, y and z axis, click-left and drag for turning, click-right and drag for movement (hold shift for z-axis movement). Arrow keys or the q, w, e, a, s, d characters also always move. (Tip: the arrow keys and the characters are active in all tools!).<br/><br/><br/><br/> |
| - | [[Image:orbitTool.jpg| | + | [[Image:orbitTool.jpg|thumb|left|48px]] |
| - | + | Right-click on the tool icon and select Orbit to switch navigation mode. Orbit mode will allow you to move around the selected Object.<br/><br/><br/><br/><br/> | |
| - | Right-click on the tool icon and select Orbit to switch navigation mode. Orbit mode will allow you to move around the selected Object. | + | |
<h3>Grid (g)</h3> | <h3>Grid (g)</h3> | ||
| - | [[Image:gridTool.jpg| | + | [[Image:gridTool.jpg|thumb|left|48px]] |
| - | + | ||
'''Toggles - when pressing TAB again you will switch to the last selected tool!''' | '''Toggles - when pressing TAB again you will switch to the last selected tool!''' | ||
| - | Allows you to position the grid in space. Grid will snap to mouse 3D coordinate when clicked anywhere within the scene. You can change the grid plane in the Brush Inspector. Tip: to change the grid axis press the period "." key. | + | Allows you to position the grid in space. Grid will snap to mouse 3D coordinate when clicked anywhere within the scene. You can change the grid plane in the Brush Inspector. Tip: to change the grid axis press the period "." key.<br/><br/><br/><br/><br/> |
<h3>Draw (b)</h3> | <h3>Draw (b)</h3> | ||
| - | [[Image:drawTool.jpg| | + | [[Image:drawTool.jpg|thumb|left|48px]] |
| + | Lets you draw particles and thus create objects in your scene. Will modify the currently selected object or auto-create a new drawing. click-and-drag-left to draw particles, click-and-drag-right to erase them. Change brush size and color in the Brush Inspector.<br/><br/><br/><br/><br/> | ||
| - | + | [[Image:drawFancy.jpg|thumb|left|48px]] | |
| + | Takes acceleration of the brush into account when drawing. Makes things look a bit more fancy.<br/><br/><br/><br/><br/> | ||
| + | [[Image:drawMeshes.jpg|thumb|left|48px]] | ||
| + | Draws using the selected Mesh as a Brush. Select Meshes by clicking on them in the AssetInspector (see below).<br/><br/><br/><br/> | ||
<h3>Bones (x)</h3> | <h3>Bones (x)</h3> | ||
| - | [[Image:boneTool.jpg| | + | [[Image:boneTool.jpg|thumb|left|48px]] |
| + | Lets you add bones to your objects. You must have a drawing selected for this tool to work. When Bone Tool is selected, left-clicking in your scene will create a bone and set its parent to the previously created bone (or the selected drawing if it is your first bone). Right clicking on a bone allows parent change with the "SetBase" button. Right-Clicking also deselects or selects a specific bone.<br/><br/><br/><br/> | ||
| - | + | [[Image:skinTool.jpg|thumb|left|48px]] | |
| - | + | Right-clicing on tool icon allows switching to Paint Weights Tool. Click on Bone to select, then click-and-drag-left to paint weights for this bone on particles. click-and-drag-right to erase weights. Supports up to 3 weights per particle. Particles without weights will be hidden from view!<br/><br/><br/><br/> | |
| - | [[Image:skinTool.jpg| | + | |
| - | + | ||
| - | Right-clicing on tool icon allows switching to Paint Weights Tool. Click on Bone to select, then click-and-drag-left to paint weights for this bone on particles. click-and-drag-right to erase weights. Supports up to 3 weights per particle. Particles without weights will be hidden from view! | + | |
| Line 61: | Line 57: | ||
<h3>PropertyInspector</h3> | <h3>PropertyInspector</h3> | ||
| - | [[Image:propertyInspector.jpg| | + | [[Image:propertyInspector.jpg|thumb|right|128px]] |
| - | + | ||
If one or more objects are selected, the PropertyInspector will show a list of all editable properties of the selected objects. The is list being generated according to the first selected objects' properties and then distributed to all when changed. | If one or more objects are selected, the PropertyInspector will show a list of all editable properties of the selected objects. The is list being generated according to the first selected objects' properties and then distributed to all when changed. | ||
Properties can be edited through specific buttons: | Properties can be edited through specific buttons: | ||
| - | [[Image:boolButton.jpg| | + | [[Image:boolButton.jpg|256px]] |
Boolean buttons toggle values by simple left-click, e.g. to toggle an objects' ''bHidden'' state. Boolean properties also always have a lower-case 'b' at the beginning of their description. | Boolean buttons toggle values by simple left-click, e.g. to toggle an objects' ''bHidden'' state. Boolean properties also always have a lower-case 'b' at the beginning of their description. | ||
| - | [[Image:textInputPropertyButton.jpg| | + | [[Image:textInputPropertyButton.jpg|256px]] |
Text-input buttons allow typing of a new value when clicked. A small blinking cursor will appear right next to the button, erasing the old value. Usually the values are prefixed by the data-type of the property, such as ''vec3fx'' or ''float''. Please do not delete this prefix as that will break things! | Text-input buttons allow typing of a new value when clicked. A small blinking cursor will appear right next to the button, erasing the old value. Usually the values are prefixed by the data-type of the property, such as ''vec3fx'' or ''float''. Please do not delete this prefix as that will break things! | ||
| Line 79: | Line 74: | ||
All properties have the option to be bound to UDP-Input by first right-clicking on the property and then left-clicking on an ''input-connect'' button with a corresponding type. The property will then be controlled by external data. | All properties have the option to be bound to UDP-Input by first right-clicking on the property and then left-clicking on an ''input-connect'' button with a corresponding type. The property will then be controlled by external data. | ||
| - | |||
<h3>Brush Inspector</h3> | <h3>Brush Inspector</h3> | ||
| - | [[Image:brushInspector.jpg| | + | [[Image:brushInspector.jpg|thumb|right|128px]] |
| - | + | ||
The brush inspector allows modification of most of the paintbrushes properties, such as color and scale. In addition, it allows the aligning of the grid along one of three planes. | The brush inspector allows modification of most of the paintbrushes properties, such as color and scale. In addition, it allows the aligning of the grid along one of three planes. | ||
| - | [[Image:gridPlaneButtons.jpg| | + | [[Image:gridPlaneButtons.jpg|thumb|left|32px]] |
| - | + | ||
Clicking on any of these buttons will align the grid on the corresponding 3D Plane. | Clicking on any of these buttons will align the grid on the corresponding 3D Plane. | ||
| + | <br/><br/><br/><br/> | ||
<h3>Asset Inspector</h3> | <h3>Asset Inspector</h3> | ||
| - | [[Image:assetInspector.jpg| | + | [[Image:assetInspector.jpg|thumb|right|128px]] |
| + | <br/><br/><br/><br/><br/><br/><br/><br/><br/> | ||
<h3>Primitives Inspector</h3> | <h3>Primitives Inspector</h3> | ||
| - | [[Image:primitivesInspector.jpg| | + | [[Image:primitivesInspector.jpg|thumb|right|128px]] |
| + | Allows the creation of advanced objects such as Characters, Cameras and Lights. The second Tab allows creation of Nodes and in-scene Logic. For a comprehensive list of Nodes and how they work, please visit the [[Nodes Tutorial]]. | ||
| + | Simply drag-and-drop the desired object type or Node into your scene to create. | ||
| + | |||
| + | [[Image:character.jpg|thumb|left|32px]] | ||
| + | A character comes with functionality such as IK Animation system, procedural walk animations, idle-Animations and can be mapped to [[Kinect Skeletal Input|Kinect Tutorial]].<br/><br/><br/><br/> | ||
| + | |||
| + | [[Image:camera.jpg|thumb|left|32px]] | ||
| + | Camera have a focus value that determines the Depth-of-Field distance, a FOV for zooming and other extended functionality (such as an experimental camera shake). Cameras are needed for the [[SwitchCam Node|Nodes Tutorial]].<br/><br/><br/><br/><br/> | ||
| + | |||
| + | [[Image:plane.jpg|thumb|left|32px]] | ||
| + | A simple 2D Plane, not rendered as Particles but as solid geometry. | ||
| + | <br/><br/><br/><br/><br/><br/> | ||
| + | |||
| + | [[Image:cube.jpg|thumb|left|32px]] | ||
| + | A simple 3D Cube, not rendered as Particles but as solid geometry. Comes predefined in funky colors!<br/><br/><br/><br/><br/><br/> | ||
| + | |||
| + | [[Image:sprite.jpg|thumb|left|32px]] | ||
| + | A pointSprite, great for light flares. Not much extended functionality beyond that. | ||
| + | <br/><br/><br/><br/><br/><br/> | ||
| + | |||
| + | [[Image:pointPatch.jpg|thumb|left|32px]] | ||
| + | Can be used for terrain, particlesystems or other things in conjunction with videoTextures, animated Textures or a heightfield. Needs a texture assigned to it. The texture channel determines the elevation of any given point in the patch. | ||
| + | <br/><br/><br/><br/> | ||
| + | |||
| + | [[Image:videoTexture.jpg|thumb|left|32px]] | ||
| + | '''Currently Windows only''' (Sorry, I'll hurry with the implementation). Allows playback of videos as a Texture. Creates a textured Plane. | ||
| + | <br/><br/><br/><br/><br/> | ||
| + | |||
| + | [[Image:light.jpg|thumb|left|32px]] | ||
| + | A Moviesandbox light. Set to throw shadows by default | ||
| + | <br/><br/><br/><br/><br/><br/> | ||
| + | |||
| + | <h3>Layer Inspector</h3> | ||
| + | |||
| + | [[Image:layerInspector.jpg|thumb|right|128px]] | ||
| + | The LayerInspector shows a list of all objects in your scene, and some extra control objects that couldn't otherwise be accessed. Clicking on individual objects in the Inspector will select them in the scene. Switching to the ''Helpers'' Tab allows selection of the Grid, Brush and Ground, to change their properties (e.g. to hide the Grid again!). | ||
| + | <br/><br/><br/><br/><br/><br/> | ||
---- | ---- | ||
| + | <h1>Keyboard command list</h1> | ||
| + | All commands are case sensitive! | ||
| + | |||
| + | |||
| + | <h3>Tools</h3> | ||
| + | |||
| + | * v - Select Tool | ||
| + | |||
| + | * TAB - Navigation Tool, will toggle with last tool | ||
| + | |||
| + | * g - Grid Tool, will toggle with last tool | ||
| + | |||
| + | * b - Paint Tool (think Brush!) | ||
| + | |||
| + | * x - Bone Tool | ||
| + | |||
| + | |||
| + | <h3>Rendering</h3> | ||
| + | |||
| + | * F2 - hide all Nodes | ||
| + | |||
| + | * F3 - toggle Color | ||
| + | |||
| + | * F4 - toggle Ambient Occlusion | ||
| + | |||
| + | * F5 - toggle light/shadow | ||
| + | |||
| + | * F6 - toggle Normals | ||
| + | |||
| + | * F7 - toggle Depth of Field | ||
| + | |||
| + | |||
| + | <h3>General</h3> | ||
| + | |||
| + | * SPACE - run scene | ||
| + | |||
| + | * X - reload all basic interface Textures (used for debugging) | ||
| + | |||
| + | * S - reload all basic shaders | ||
| + | |||
| + | * h - hide Grid (toggles hidden/unhidden) | ||
| + | |||
| + | * . - switch Grid plane | ||
| + | |||
| + | * G - group objects (must have multiple selected | ||
| + | |||
| + | * Ctrl-s - Save | ||
| + | |||
| + | * Ctrl-x - Cut | ||
| + | |||
| + | * Ctrl-c - Copy | ||
| + | |||
| + | * Ctrl-v - Paste on mouse 3D coordinate | ||
| + | |||
| + | * Ctrl-Shift-V - Paste in original location | ||
| + | |||
| + | |||
| + | ---- | ||
| - | < | + | <h1>Unsorted info from here...</h1> |
| - | + | Props menu: this button displays the menu for props. | |
| - | + | Place mesh: by selecting this button and clicking anywhere in the world you can place an actor. You can also drag and drop the icon anywhere in the world. By default the last loaded actor will be placed, in order to place another actor just click on the props inspector button on the right hand side menu and drag the actor you would like to add on top of the default one. | |
| Line 117: | Line 206: | ||
| - | + | Place character: This places a character in the world, just click with your mouse wherever you want to position. | |
Place camera: place a camera anywhere in the world. | Place camera: place a camera anywhere in the world. | ||
| - | + | Place dummy: place a dummy. | |
| - | + | Place light: place a light anywhere in the world. | |
| - | + | Draw: Select to display the drawing menu. | |
| - | + | New drawing: Create a new drawing. | |
Draw particles (p): Select this tool to draw, to change the attributes of the brush go to the brush inspector. | Draw particles (p): Select this tool to draw, to change the attributes of the brush go to the brush inspector. | ||
| - | + | Draw calligraphy: Draw with different stroke weights | |
Select drawing: Use to select a specific drawing. | Select drawing: Use to select a specific drawing. | ||
| Line 137: | Line 226: | ||
Select particles: Use to select specific particles within a drawing. | Select particles: Use to select specific particles within a drawing. | ||
| - | + | Import Kinect: Select to start using the Kinect as imput (remeber to have the Kinect connected!) | |
| - | + | Import bitmap: what it says | |
| - | + | Merge drawings: | |
| - | + | Scale Z x2: Double the size of your drawing | |
| - | + | Scale Zx 0.5: Shrink your drawing by half. | |
Save | Save | ||
| - | + | Save as | |
| - | + | Clear drawing: Clear the world from drawings, this does not delete them, just clears the space. | |
| - | + | Bones: opens the bones menu | |
| - | + | Add bones: Select to add bones to your drawings by clicking where you wish to add the bone. | |
| - | + | Paint weights: with this tool you attach the particles of your drawing to the bones. Simply click on the bone and draw on top of the part of the drawing you wish to be a part of that bone. | |
| - | + | Load bones: if you previously made bones or are sharing files with someone else you can load them here. | |
| - | + | Node menu: Select to display the node menu | |
| - | + | System menu. | |
Property inspector: this tool allows you to see and edit the properties of your actors. You should have an actor selected for it to show the properties. | Property inspector: this tool allows you to see and edit the properties of your actors. You should have an actor selected for it to show the properties. | ||
| - | + | Brush inspector: You can change the size of the brush its intensity and the color you are drawing with with in this panel. | |
| - | + | Texture inspector: This panel shows the textures available in the Moviesandbox project. You can import new textures and add them to the library by using the import button in this panel. | |
| - | + | Mesh inspector: Has a list of all the drawings and meshes available in the project. | |
Action inspector: Displays a list of the available actions and allows you to import new ones. | Action inspector: Displays a list of the available actions and allows you to import new ones. | ||
| - | + | Prefab inspector: | |
| - | + | Layers inspector: Gives you a list of all the actors in the project. Each actor is in a layer so you can have various options to play with them. | |
*/ | */ | ||
Current revision
Contents |
[edit] Tools
Tools work a bit like in Photoshop. They allow you to manipulate certain aspects of your scene, depending on the tool selected. For example - you cannot select objects when using the navigation tool. You can also think of the tools as Modes or States that Moviesandbox is in. Right clicking on a Tool usually reveals additional options. Keyboard shortcuts in brackets next to tool name.
[edit] Select Tool (v)
 Allows you to select objects you want. Right click objects for additional menu options. Click on the Gizmo that appears after selecting to move/rotate in a specific axis. Hold SHIFT to multi-select.
 Right click on the tool icon and select "Select Particles" to select individual particles from within a drawing. A drawing must already be selected for this to work.
[edit] Navigate Tool (TAB)
 Toggles - when pressing TAB again you will switch to the last selected tool!
Allows navigation through space in the x, y and z axis, click-left and drag for turning, click-right and drag for movement (hold shift for z-axis movement). Arrow keys or the q, w, e, a, s, d characters also always move. (Tip: the arrow keys and the characters are active in all tools!).
 Right-click on the tool icon and select Orbit to switch navigation mode. Orbit mode will allow you to move around the selected Object.
[edit] Grid (g)
 Toggles - when pressing TAB again you will switch to the last selected tool!
Allows you to position the grid in space. Grid will snap to mouse 3D coordinate when clicked anywhere within the scene. You can change the grid plane in the Brush Inspector. Tip: to change the grid axis press the period "." key.
[edit] Draw (b)
 Lets you draw particles and thus create objects in your scene. Will modify the currently selected object or auto-create a new drawing. click-and-drag-left to draw particles, click-and-drag-right to erase them. Change brush size and color in the Brush Inspector.
 Takes acceleration of the brush into account when drawing. Makes things look a bit more fancy.
Image:DrawMeshes.jpg
Draws using the selected Mesh as a Brush. Select Meshes by clicking on them in the AssetInspector (see below).
[edit] Bones (x)
 Lets you add bones to your objects. You must have a drawing selected for this tool to work. When Bone Tool is selected, left-clicking in your scene will create a bone and set its parent to the previously created bone (or the selected drawing if it is your first bone). Right clicking on a bone allows parent change with the "SetBase" button. Right-Clicking also deselects or selects a specific bone.
 Right-clicing on tool icon allows switching to Paint Weights Tool. Click on Bone to select, then click-and-drag-left to paint weights for this bone on particles. click-and-drag-right to erase weights. Supports up to 3 weights per particle. Particles without weights will be hidden from view!
[edit] Inspectors
These are menus that can be accessed on the right-hand side of the interface. They allow modification and access of content in the scene, asset import options and scene management.
[edit] PropertyInspector
 If one or more objects are selected, the PropertyInspector will show a list of all editable properties of the selected objects. The is list being generated according to the first selected objects' properties and then distributed to all when changed.
Properties can be edited through specific buttons:
Boolean buttons toggle values by simple left-click, e.g. to toggle an objects' bHidden state. Boolean properties also always have a lower-case 'b' at the beginning of their description.
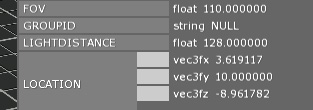
Text-input buttons allow typing of a new value when clicked. A small blinking cursor will appear right next to the button, erasing the old value. Usually the values are prefixed by the data-type of the property, such as vec3fx or float. Please do not delete this prefix as that will break things!
Image:PickWorldPropertyButton.jpg
Sometimes, properties will be links to other objects in the scene. In this case, properties are set by clicking on the corresponding property-Button and then clicking on the corresponding object within the scene to create the link.
All properties have the option to be bound to UDP-Input by first right-clicking on the property and then left-clicking on an input-connect button with a corresponding type. The property will then be controlled by external data.
[edit] Brush Inspector
 The brush inspector allows modification of most of the paintbrushes properties, such as color and scale. In addition, it allows the aligning of the grid along one of three planes.
 Clicking on any of these buttons will align the grid on the corresponding 3D Plane.
[edit] Asset Inspector
[edit] Primitives Inspector
 Allows the creation of advanced objects such as Characters, Cameras and Lights. The second Tab allows creation of Nodes and in-scene Logic. For a comprehensive list of Nodes and how they work, please visit the Nodes Tutorial.
Simply drag-and-drop the desired object type or Node into your scene to create.
 A character comes with functionality such as IK Animation system, procedural walk animations, idle-Animations and can be mapped to Kinect Tutorial.
 Camera have a focus value that determines the Depth-of-Field distance, a FOV for zooming and other extended functionality (such as an experimental camera shake). Cameras are needed for the Nodes Tutorial.
 A simple 2D Plane, not rendered as Particles but as solid geometry.
 A simple 3D Cube, not rendered as Particles but as solid geometry. Comes predefined in funky colors!
![]() A pointSprite, great for light flares. Not much extended functionality beyond that.
A pointSprite, great for light flares. Not much extended functionality beyond that.
 Can be used for terrain, particlesystems or other things in conjunction with videoTextures, animated Textures or a heightfield. Needs a texture assigned to it. The texture channel determines the elevation of any given point in the patch.
Image:VideoTexture.jpg
Currently Windows only (Sorry, I'll hurry with the implementation). Allows playback of videos as a Texture. Creates a textured Plane.
 A Moviesandbox light. Set to throw shadows by default
[edit] Layer Inspector
 The LayerInspector shows a list of all objects in your scene, and some extra control objects that couldn't otherwise be accessed. Clicking on individual objects in the Inspector will select them in the scene. Switching to the Helpers Tab allows selection of the Grid, Brush and Ground, to change their properties (e.g. to hide the Grid again!).
[edit] Keyboard command list
All commands are case sensitive!
[edit] Tools
- v - Select Tool
- TAB - Navigation Tool, will toggle with last tool
- g - Grid Tool, will toggle with last tool
- b - Paint Tool (think Brush!)
- x - Bone Tool
[edit] Rendering
- F2 - hide all Nodes
- F3 - toggle Color
- F4 - toggle Ambient Occlusion
- F5 - toggle light/shadow
- F6 - toggle Normals
- F7 - toggle Depth of Field
[edit] General
- SPACE - run scene
- X - reload all basic interface Textures (used for debugging)
- S - reload all basic shaders
- h - hide Grid (toggles hidden/unhidden)
- . - switch Grid plane
- G - group objects (must have multiple selected
- Ctrl-s - Save
- Ctrl-x - Cut
- Ctrl-c - Copy
- Ctrl-v - Paste on mouse 3D coordinate
- Ctrl-Shift-V - Paste in original location
[edit] Unsorted info from here...
Props menu: this button displays the menu for props.
Place mesh: by selecting this button and clicking anywhere in the world you can place an actor. You can also drag and drop the icon anywhere in the world. By default the last loaded actor will be placed, in order to place another actor just click on the props inspector button on the right hand side menu and drag the actor you would like to add on top of the default one.
Spawn meshes: this is a quick way to place several actors in the world.
Place character: This places a character in the world, just click with your mouse wherever you want to position.
Place camera: place a camera anywhere in the world.
Place dummy: place a dummy.
Place light: place a light anywhere in the world.
Draw: Select to display the drawing menu.
New drawing: Create a new drawing.
Draw particles (p): Select this tool to draw, to change the attributes of the brush go to the brush inspector.
Draw calligraphy: Draw with different stroke weights
Select drawing: Use to select a specific drawing.
Select particles: Use to select specific particles within a drawing.
Import Kinect: Select to start using the Kinect as imput (remeber to have the Kinect connected!)
Import bitmap: what it says Merge drawings:
Scale Z x2: Double the size of your drawing Scale Zx 0.5: Shrink your drawing by half.
Save
Save as
Clear drawing: Clear the world from drawings, this does not delete them, just clears the space.
Bones: opens the bones menu
Add bones: Select to add bones to your drawings by clicking where you wish to add the bone.
Paint weights: with this tool you attach the particles of your drawing to the bones. Simply click on the bone and draw on top of the part of the drawing you wish to be a part of that bone.
Load bones: if you previously made bones or are sharing files with someone else you can load them here.
Node menu: Select to display the node menu System menu. Property inspector: this tool allows you to see and edit the properties of your actors. You should have an actor selected for it to show the properties. Brush inspector: You can change the size of the brush its intensity and the color you are drawing with with in this panel.
Texture inspector: This panel shows the textures available in the Moviesandbox project. You can import new textures and add them to the library by using the import button in this panel.
Mesh inspector: Has a list of all the drawings and meshes available in the project.
Action inspector: Displays a list of the available actions and allows you to import new ones.
Prefab inspector: Layers inspector: Gives you a list of all the actors in the project. Each actor is in a layer so you can have various options to play with them.
- /
Initial Descriptions by Carolina Vallejo!
